3. Flashing and Application Upload
This guide covers the two distinct steps required for setting up the ISURLOG development environment: first, flashing the MicroPython binary, and second, uploading the application logic.
Just installing an official release, not developing firmware?
IsurDASH has a guided firmware update tool (Serial port (USB) method) that walks you through this same RST/BOOT sequence with a friendlier UI — see 6.8. Device Maintenance. This page is for developers flashing a custom/locally-built firmware.bin that isn't a published release.
3.1 Required External Hardware
The ISURLOG board does not include an integrated USB-to-UART converter. Developers must use an external UART TTL to USB converter to communicate with and flash the ESP32.
Key PCB Components
Identify the necessary buttons and the serial programming port (UART) on the ISURLOG PCB:
- Buttons: RESET and BOOT.
- Programming Port: The UART port, labeled "ESP".
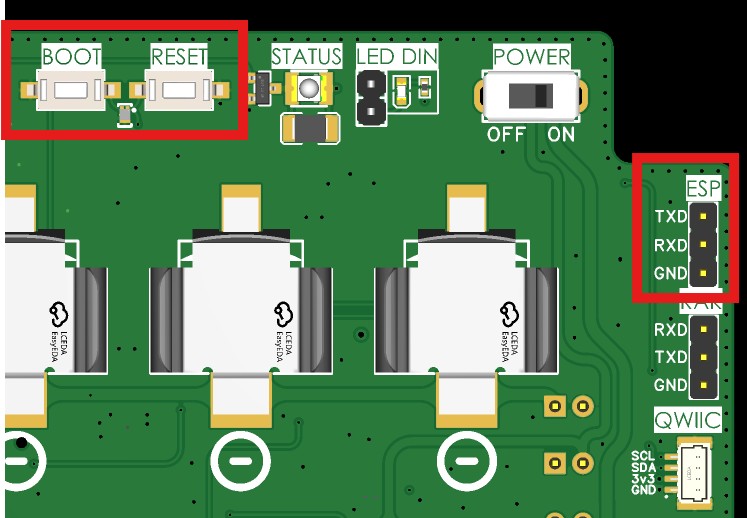
The RESET/BOOT buttons and the ESP UART programming port.
3.2 Flashing the Firmware Core (firmware.bin)
This procedure puts the ESP32 into download mode to load the compiled firmware.bin file (Layer 1).
Step 1: Connect Hardware
- Connect the external USB-UART converter to the "ESP" port pins on the ISURLOG PCB.
- Ensure you have the compiled
firmware.binfile ready (from 1. Build Environment Setup).
Step 2: Enter Download Mode (BOOT)
To put the ESP32 into download mode:
- Press and hold the RST button.
- While holding RST, press and hold the BOOT button.
- Release the RST button.
- Release the BOOT button.
The serial monitor should display the message "Waiting for download", confirming the ESP32 is ready for firmware upload.
Step 3: Use Flashing Tool (e.g., Thonny or esptool.py)
While the standard method uses esptool.py, the simplest way for MicroPython is often through an IDE interface (Thonny is shown here as an example):
- Open Thonny.
- Navigate to Tools > Options > Interpreter.
- Click "Install or update MicroPython (esptool)".
- Select the port number connected to the ISURLOG.
- Select the previously downloaded MicroPython binary and click "Install".
- Wait for the installation process to complete. The development environment provides detailed information about the operation.
- Once the process is complete, press the RST button or toggle the ON/OFF switch to restart the ISURLOG and boot into MicroPython.
3.3 Uploading Application Code (Layer 2)
After flashing the firmware.bin, you must upload the application logic files from the /app folder to the device's filesystem.
This process is simpler and does not require the BOOT/RESET sequence. Tools like Thonny, rshell, or standard MicroPython commands can be used to copy the contents of the /app folder (including main.py, configuration, and utility files) onto the live filesystem of the ISURLOG via the USB-UART converter.
Tip
Ensure the ISURLOG is running in its normal operating mode (ON/OFF switch is ON) when uploading the application code via Thonny's filesystem view.